Feb 14, 2014

Step 21. Love is in the air

I've been spending the morning hours this week stitching Valentine hearts.

Embroidery on wool felt.
I was originally inspired by zentangle hearts. I tried making some tentangles of my own to use as a pattern for my stitching, but I'm not zen enough to pull them off. I'm guessing zentangles are supposed to be relaxing and free, but I was stressed out thinking up doodles.

Instead, I free-styled these hearts with the needle in my hand instead of a pencil. I started with a French knot in the middle of the heart and just kept going around in circles until the spaces were filled. The white one went much more quickly than the red one because I copied the first pattern and didn't have to think as I stitched along. That was zen for me.

I got ideas from a heart tattoo I saw online and also from my bedspread. The bedspread was a convenient inspiration as I stitched these mostly in the early morning hours.


Happy Valentines Day.


Feb 10, 2014

Step 20. Keep up traditions

I like to make felt creatures for Valentines Day. I usually make my own design, but this year I bought a pattern to download  from craftsy.com, which has some really cute projects.


Wool felt is a forgiving material that doesn't mind a little tugging or stretching, and can be worked and re-worked without showing wear. My cats like to sleep on whatever project I'm making, and I have to guard it or keep the lint roller in constant use. I bought this batch of felt from Magic Cabin.


These little monkeys are surprises for Valentines Day, and I worked on them on the sly this past week.


All done.

Feb 7, 2014

Step 19. Find inspiration

My notebook sketches, inspired by artwork by Sakai Hoitsu, whose work I visited at the Met this week.


Jan 31, 2014

Step 18. Back it up

I added a dark background to the design based on the ancient Roman floor mosaic. The color blue was a nice treat to use. I usually draw plants and don't get use to use a blue like this very often. (The lighting in this photo makes the blue coverage look uneven, but it isn't.)  I've had trouble with white flowers on white paper in the past, and using a dark background color solves the problem. Plus, the repetitive and easy task of coloring in the background is calming and meditative.


I definitely want to do some more borders and scrolls. It's been great fun doing this one. 


Jan 30, 2014

Step 17. Break it down

Different people do things differently. Go figure.

When I have a project to do or a day to plan, I need to break it down into tiny steps. Other people don't do that - they jump right in and manage to do a bunch of things at once. That's great for them, but it's not how I work best. 

I know it's popular to multi-task and it seems like most people like to work that way, but that style feels like chaos to me. Focusing on one task is much more comfortable for me, and finishing one step motivates me want to keep on moving to the next. 


A border design of an ancient Roman mosaic I saw at the Met inspired me to draw it. I worked at it step-by-step this week, mostly in the early morning (thank you for helping me wake up early, Andy Traub).


Colored pencil on paper, inspired by Roman mosaic at the Metropolitan Museum of Art, NYC.
I'm not finished yet. The next step I want to do is adding a dark background, which is a new thing for me. I half-expect that I'll ruin the drawing in the process, but that's okay. I'm more interested in trying to add background color than I am in saving this drawing. 

Jan 28, 2014

Step 16. Benched

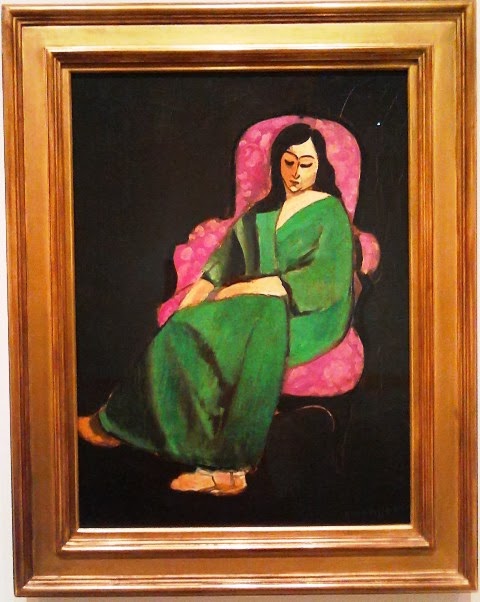
I had an art lesson with Matisse last week. I noticed a Matisse painting in front of a bench on my last visit to the Met, so he was my teacher that day.

I started my sketch with the hair because the shape was simple to copy. As I moved on to the robe, arms, and shoes, I realized everything was a shape. I guess that's a basic thing to know, but it took drawing it for me to get it. I saw a triangle here, a rectangle there. Drawing the outline was like fitting puzzle pieces together. My sketch didn't match Matisse's perfectly, but then again, I'm not Matisse. I'm a student learning from the master.


In the end, I could finally make out the black outline of the chair. Matisse's background is black, and I didn't notice the woodwork on the chair until after I looked at the painting for a long time. The label next to the painting says that Matisse was intrigued by using black as a color. That's a lesson I'll learn another time. This lesson was about seeing shapes.


Julia Cameron writes in The Artist's Way, "Art is not about thinking something up. It is about the opposite - getting something down....We're not doing; we're getting....Instead of reaching for inventions, we are engaged in listening." I thought about that quote as I made the contour drawing. I felt like the lesson of shapes was falling right into my lap. All I had to do was be there to catch it.

I also thought about the saying that a teacher will appear when the student is ready. I won't complain when the teacher who appears is Matisse, even if he appears because I was ready for a bench to sit on. Maybe I'll create my own course called Masters at the Met by Benches, followed by Great Artwork Close to the Restroom.

Laurette in a Green Robe, Black Background by Matisse, 1916. Metropolitan Museum of Art, NYC.


Jan 27, 2014

Step 15. Tools of the trade

A pencil and some sort of paper to write on - that's the extent of my concern about what tools to use when drawing. 

I don't pay much attention to remembering brands or qualities of materials I use, but I decided to take things more seriously and pay attention to the materials I use.


This weekend I went to a couple of  art supply stores to pick up some things I needed. The colored pencils I purchased are by Faber Castell. Faber Castell makes a few types of colored pencils, and the ones I purchased are polychromos. The colors blend well, and they are oil based. I also bought a couple of black pencils Prismacolor Verithin. I like the Verithin pencils because, well, they are very thin. I can sharpen them to a super thin point, which is great for a precise lines. 

After my little shopping spree, I stopped at a coffee shop and couldn't resist trying out the new pencils. I made a drawing in my lined notebook, using a Flair felt-tip marker to outline the design and the new color pencils to fill it in.

The design is based on an ancient Roman mosaic I saw on a recent visit to the Met. I liked how the pencils worked and I started a more detailed version of the same design when I got home.